4주차 과제: 제어문
제어문
- 프로그램 코드의 실행 흐름에 따라 제어하는 구문
조건문
- 조건에 따라 코드의 실행 흐름을 제어하는 구문
if문
- 조건식이 참인 경우 실행
public class conditionalSample {
    public static void main(String[] args) {
        int score = 90;

        if (score >= 90) {
            System.out.println("A학점 입니다");
        }
        if (score < 90) {
            System.out.println("A학점이 아닙니다");
        }
    }
}
결과
A학점 입니다if-else 문
- 조건식의이 참인 경우 실행하고 거짓일때 else 문의 코드가 실행
public class conditionalSample {
    public static void main(String[] args) {
        int score = 90;

        if (score >= 90) {
            System.out.println("A학점 입니다");
        } else {
            System.out.println("A학점이 아닙니다");
        }
    }
}
결과
A학점 입니다선택문
- 선택문은 일치하는 변수의 값에 따라서 결과를 도출 해낸다.
- 다중 if문 대신 사용하거나, if문을 여러개 사용하면 실행속도가 느려지는 우려가 있어서 사용한다
- switch 함수의 매개변수에 들어오는 값에 따라 코드를 실행한다.
public class conditionalSample {
    public static void main(String[] args) {
        int score = 90;

        switch (score) {
            case 95:
                System.out.println("A+");
                break;
            case 90:
                System.out.println("A");
                break;
            case 85:
                System.out.println("B+");
                break;
        }
    }
}
결과
A반복문
- 특정 조건에 만족할때 코드를 반복해서 실행시킨다
for 문
- 반복하는 횟수를 정해서 사용한다
public class loopSample {
    public static void main(String[] args) {
        for(int i = 0 ; i<9; i++) {
            System.out.println(i);
        }
    }
}
결과
**0
1
2
3
4
5
6
7
8**
while 문
- 조건이 참일때 동안 반복해서 실행한다. 반복 횟수가 정해져 있지않다
public class loopSample {
    public static void main(String[] args) {
        int i = 0;
        while (i < 10) {
            System.out.println(i);
            i++;
        }
    }
}
do-while 문
- 처음 한번 do절은 무조건 실행을 하고 다음 while문에 조건에 따라서 실행하는 구문이다
public class loopSample {
    public static void main(String[] args) {
        int i = 0;
        do {
            System.out.println(i);
            i++;
        } while (i < 10) ;
    }
}
결과
0
1
2
3
4
5
6
7
8
9
과제 0. JUnit 5
- JUnit은 자바 프로그래밍 언어용 유닛 테스트 프레임워크이다. JUnit은 테스트 주도 개발 면에서 중요하며, SUnit과 함께 시작된 XUnit이라는 이름의 유닛 테스트 프레임워크 계열의 하나이다.
- JUnit은 단위 테스트를 위한 테스트용 프레임워크이다
- Java 8 이상의 새로운 기능을 지원한다
Java 11 기준
Gradle 의존성 추가
build.grade 추가
dependencies {
    testImplementation 'org.junit.jupiter:junit-jupiter-api:5.6.0'
    testRuntimeOnly 'org.junit.jupiter:junit-jupiter-engine'
}

test {
    useJUnitPlatform()
}
Maven 의존성 추가
pom.xml 추가
<dependency>
    <groupId>org.junit.jupiter</groupId>
    <artifactId>junit-jupiter-engine</artifactId>
    <version>5.6.0</version>
    <scope>test</scope>
</dependency>
과제 1. live-study 대시 보드를 만드는 코드를 작성하세요.
- 깃헙 이슈 1번부터 18번까지 댓글을 순회하며 댓글을 남긴 사용자를 체크 할 것.
- 참여율을 계산하세요. 총 18회에 중에 몇 %를 참여했는지 소숫점 두자리가지 보여줄 것.
- Github 자바 라이브러리를 사용하면 편리합니다.
- 깃헙 API를 익명으로 호출하는데 제한이 있기 때문에 본인의 깃헙 프로젝트에 이슈를 만들고 테스트를 하시면 더 자주 테스트할 수 있습니다.
String token = "";
GitHub gitHub = new GitHubBuilder().withOAuthToken(token).build();

GHRepository repo = gitHub.getRepository("whiteship/live-study");

// 전체 이슈 18개
List<GHIssue> issues = repo.getIssues(ALL);

// 전체 참가자
Map<String, Integer> participantI = new HashMap<>();

for (GHIssue issue : issues) {
    List<GHIssueComment> comments = issue.getComments();
    Set<String> names = new HashSet<>();
    for (GHIssueComment comment : comments) {
        String name = comment.getUser().getLogin();
        names.add(name);
    }

    for (String user : names) {
        if (participantI.containsKey(user)) {
            Integer cnt = participantI.get(user)+1;
            participantI.put(user,cnt);
        } else {
            participantI.put(user, 1);
        }
    }
}
participantI.forEach(
        (s, integer) -> {
            System.out.println(s+" = "+String.format("%.2f", (float) integer / 18)+"%");
        }
);
결과
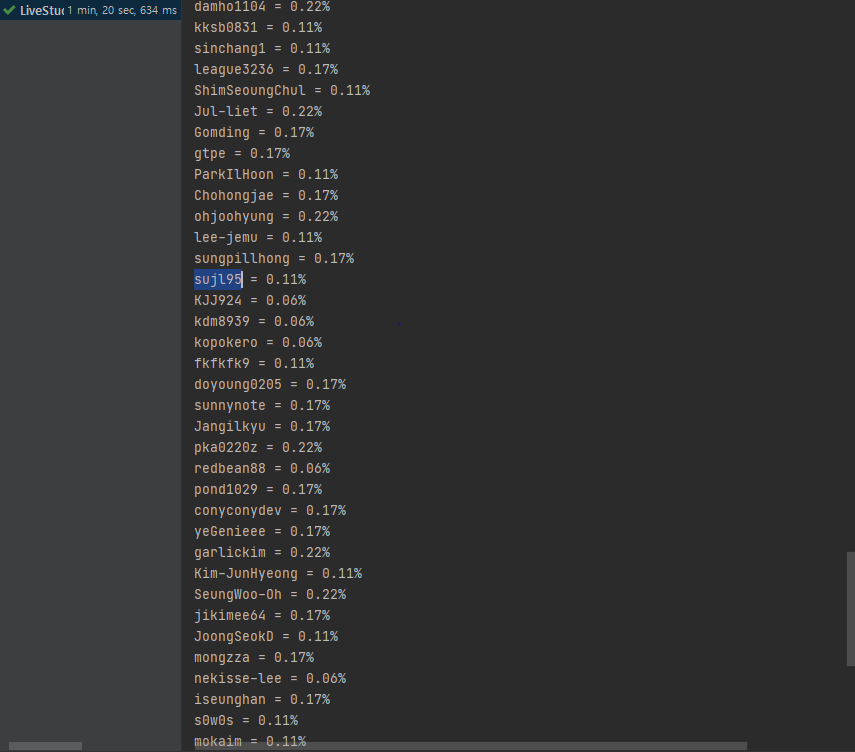
코드
https://github.com/sujl95/LiveStudy/blob/main/src/main/java/LiveStudy/_4Week/GithubSample.java
과제 2. LinkedList를 구현하세요.
- LinkedList에 대해 공부하세요.
- 정수를 저장하는 ListNode 클래스를 구현하세요.
- ListNode add(ListNode head, ListNode nodeToAdd, int position)를 구현하세요.
- ListNode remove(ListNode head, int positionToRemove)를 구현하세요.
- boolean contains(ListNode head, ListNode nodeTocheck)를 구현하세요.
LinkedList
노드 간에 연결(link)을 통해서 리스트로 구현된 객체이다. 다음 노드의 위치 정보만 가지고 있으며 인덱스를 가지고 있지 않기 때문에 탐색시 순차접근만 가능 (노트 탐색 시 시간이 많이 소요될 수 있음)(randomAccess 불가능)노드 추가/삭제는 위치정보의 수정만으로 가능하기 때문에 성능이 좋음
LinkedList는 ArrayList와는 달리 List 인터페이스를 구현한 AbstractList를 상속하지 않고 AbstractSequentialList를 상속한다.

LinkedList의 삽입/삭제 과정
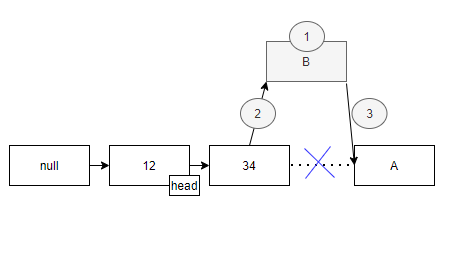
- 추가될 자료의 node 를 생성
- 추가될 자료의 해당 인덱스 이전의 node의 다음 node를 추가될 node로 지정
- 추가될 node의 다음 node를 인덱스 이전 node의 다음 node로 지정

- 삭제할 node[34] 의 이전 node[12]의 다음 node를 삭제할 node[33]의 다음 node[A]로 지정
구현
package LiveStudy._4Week;

public class ListNode {

    /**
     * ListNode add(ListNode head, ListNode nodeToAdd, int position)를 구현하세요.
     * ListNode remove(ListNode head, int positionToRemove)를 구현하세요.
     * boolean contains(ListNode head, ListNode nodeTocheck)를 구현하세요.
     */

    private int data;
    private boolean headCk;
    private ListNode next;
    private int size = 0;

    public ListNode() {
        headCk = true;
    }

    public ListNode(int data) {
        this.data = data;
    }

    /**
     *
     * @param head
     * @param nodeToAdd
     * @param position
     * @return
     */
    public ListNode add(ListNode head, ListNode nodeToAdd, int position) {
        if (position == 0) {
            ListNode temp = head.next;
            head.next = nodeToAdd;
            nodeToAdd.next = temp;
            return nodeToAdd;
        }
        if (head.next != null) {
            return add(head.next, nodeToAdd, position-1);
        }
        head.next = nodeToAdd;
        size++;
        return nodeToAdd;
    }

    /**
     * 현재 사이즈 보다 큰 값이 들어올 경우 마지막 노드의 값을 삭제한다
     * @param head
     * @param positionToRemove
     * @return
     */
    public ListNode remove(ListNode head, int positionToRemove) {
        if (size == 0) {
            System.out.println("size = 0");
            return null;
        }
        ListNode temp = head;
        int sizeCk = positionToRemove > size ? size : positionToRemove;
        for (int i = 0; i < sizeCk-1; i++) {
            temp = temp.next;
        }
        ListNode temp1 = temp.next;
        temp.next = temp1.next;
        temp1.next = null;
        size--;
        return head;
    }

    public boolean contains(ListNode head, ListNode nodeToCheck) {
        ListNode temp = head.next;
        if (temp == null) return false;
        if(temp.data == nodeToCheck.data) return true;
        else return contains(temp, nodeToCheck);
    }

    @Override
    public String toString() {
        if (next != null) {
            if (headCk) {
                return "--start\n"+next.toString();
            }
            return data+"\n"+next.toString();
        }
        return data+"\n--end";
    }

    public int getSize() {
        return size;
    }

        public int getData() {
        return data;
    }
}
Run
ListNode head = new ListNode();

head.add(head , new ListNode(5), 1);
head.add(head , new ListNode(6), 2);
head.add(head , new ListNode(7), 3);
head.remove(head, 3);
head.remove(head, 5);
System.out.println(head.contains(head, new ListNode(5)));
System.out.println(head.contains(head, new ListNode(3)));
System.out.println(head.contains(head, new ListNode(7)));
System.out.println(head.getSize());
System.out.println(head.toString());
결과
true
false
false
1
--start
5
--end
과제 3. Stack을 구현하세요.
- int 배열을 사용해서 정수를 저장하는 Stack을 구현하세요.
- void push(int data)를 구현하세요.
- int pop()을 구현하세요.
구현
package LiveStudy._4Week;

import java.util.Arrays;

public class ListNodeStack {
    /**
     * int 배열을 사용해서 정수를 저장하는 Stack을 구현하세요.
     * void push(int data)를 구현하세요.
     * int pop()을 구현하세요.
     */
    int[] data;
    int size;
    int pos;

    public ListNodeStack() {
        this.size = 10;
        this.data = new int[size];
        this.pos = 0;
    }

    /**
     * 생성할때 0번째 값 지정
     * @param data
     */
    public ListNodeStack(int data) {
        this.size = 10;
        this.data = new int[size];
        this.pos = 1;
        this.data[0] = data;
    }

    public void push(int data) {
        if (this.size == this.pos +1) {
            int[] newData = new int[size + 10];
            for (int i = 0; i< size; ++i) newData[i] = this.data[i];
            size += 10;
            this.data = newData;
        }
        this.data[this.pos++] = data;
    }

    public int pop() {
        if (this.pos == 0) {
            System.out.println("size = 0");
            return -1;
        }
        int resData = data[this.pos-1];
        data[this.pos-1] = 0;
        --this.pos;
        return resData;
    }

    @Override
    public String toString() {

        return "ListNodeStack{" +
                "data=" + Arrays.toString(data) +
                ", size=" + size +
                ", pos=" + pos +
                '}';
    }
}
실행
package LiveStudy._4Week;

public class ListNodeStackSample {
    public static void main(String[] args) {

        ListNodeStack stack = new ListNodeStack();

        stack.push(0);
        stack.push(0);
        stack.push(1);
        stack.push(2);
        stack.push(3);
        stack.push(4);
        stack.push(5);
        stack.push(6);
        stack.push(7);
        stack.push(8);
        stack.push(9);
        stack.push(10);
        System.out.println(stack.pop());
        System.out.println(stack.pop());
        System.out.println(stack.pop());
        System.out.println(stack.pop());
        System.out.println(stack.pop());
        System.out.println(stack.pop());
        System.out.println(stack.pop());
        System.out.println(stack.pop());
        System.out.println(stack.pop());
        System.out.println(stack.pop());
        System.out.println(stack.pop());
        System.out.println(stack.pop());
        System.out.println(stack.pop());

        System.out.println(stack.toString());
    }
}
결과
10
9
8
7
6
5
4
3
2
1
0
0
size = 0
-1
ListNodeStack{data=[0, 0, 0, 0, 0, 0, 0, 0, 0, 0, 0, 0, 0, 0, 0, 0, 0, 0, 0, 0], size=20, pos=0}
과제 4. 앞서 만든 ListNode를 사용해서 Stack을 구현하세요.
- ListNode head를 가지고 있는 ListNodeStack 클래스를 구현하세요.
- void push(int data)를 구현하세요.
- int pop()을 구현하세요.
구현
package LiveStudy._4Week;

public class ListNodeStack2 {
    ListNode head;
    int size = 0;

    public ListNodeStack2() {
        head = new ListNode();
    }

    public void push(int data) {

        head.add(head, new ListNode(data), size++);
    }

    public int pop() {
        try {
            head.remove(head, size--);

            return head.getData();
        } catch (Exception e) {
            return -1;
        }
    }

    @Override
    public String toString() {
        return ""+head;
    }
}
실행
public class ListNodeStackSample2 {
    public static void main(String[] args) {

        ListNodeStack2 stack = new ListNodeStack2();
        stack.push(0);
        stack.push(0);
        stack.push(1);
        stack.push(2);
        stack.push(3);
        stack.push(4);
        stack.push(5);
        stack.push(6);
        stack.push(7);
        stack.push(8);
        stack.push(9);
        stack.push(10);
        System.out.println(stack.toString());

        stack.pop();
        stack.pop();
        stack.pop();
        stack.pop();
        System.out.println(stack.toString());
    }
}
결과
--start
0
0
1
2
3
4
5
6
7
8
9
10
--end
--start
0
0
1
2
3
4
5
6
--end
과제 5. Queue를 구현하세요.
- 배열을 사용해서 한번
- ListNode를 사용해서 한번.
'스터디 > LiveStudy' 카테고리의 다른 글
| 7주차 과제: 패키지 (0) | 2020.12.30 |
|---|---|
| 6주차 과제: 상속 (0) | 2020.12.21 |
| 5주차 과제: 클래스 (0) | 2020.12.19 |
| 2주차 자바 데이터 타입, 변수 그리고 배열 (0) | 2020.11.20 |
| 1주차 과제: JVM은 무엇이며 자바 코드는 어떻게 실행하는 것인가. (0) | 2020.11.20 |