AOP란?
- AOP는 Aspect Oreiented Programming의 약자로 관점 지향 프로그래밍이라고 불린다.
- 쉽게 말해서 어떤 로직을 기준으로 핵심적인 관점, 부가적인 관점으로 나누어 보며 그 관점들을 기준으로 모듈화를 한다는 것이다.
- 모듈화란 어떤 공통된 로직이나 기능을 하나의 단위로 묶는 것이다.
- 핵심적인 관점은 우리가 적용하고자 하는 핵심 비즈니스 로직이다.
- 부가적인 관점은 핵심 로직을 실행하기 위해서 행하는 DB Connection, Logging, I/O 등 다양하게 있다.
- 애플리케이션 전체에 걸쳐 사용되는 기능을 재사용하도록 지원하고 흩어진 Aspect를 모듈화 할 수 있는 프로그래밍 기법입니다.
- Spring 는 AOP의 구현체를 제공하며 자바에 만들어져있는 AOP 구현체가 있다.
모듈화
- AOP에서 각 관점을 모듈화 한다는 것은 핵심적인 관점과 부가적인 관점을 기준으로 코드들을 부분적으로 나누어서 모듈화를 한다는 뜻이다. 이때 소스 코드상에서 다른 부분을 계속 반복해서 사용하거나 공통적으로 사용하는 코드들을 볼 수 있는데 이때 이것을 흩어진 관심사 (Crosscutting Concerns)라고 한다.
흩어진 관심사 (Crosscutting Concerns)
AOP를 적용하여 모듈화를 하게되면?

- 트랜잭션을 예로들면
- 커밋하고 롤백시키는데 기존의 서비스 코드를 감싼다.
- 로깅을 예로들면
- 로깅하는 기능을 추가하여 할 수 있다.
- 흩어진 관심사를 Aspect로 모듈화하고 핵심적인 관점 비즈니스 로직에서 분리하여 재사용한다는것이 AOP의 취지이다.
AOP의 주요 개념
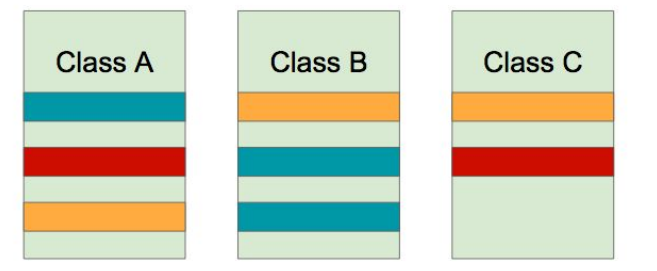
- Aspect : 위에서 설명한 흩어진 관심사를 모듈화하여 묶은 것. 주로 부가기능을 모듈화함. 모듈이라고 보면된다.
- Target : Aspect가 가지고있는 Advice 를 적용하는 대상 (클래스, 메서드 .. )
- EX) 위 그림에서 Class A, Class B, Class C
- Advice : 실질적으로 해야할 일들 및 부가 기능을 담은 구현체
- Joinpoint : Advice가 적용될 위치, 끼어들 수 있는 지점. 메서드 실행, 호출 시점, 생성자 호출 시점, 필드에 접근하기 전, 필드에서 값을 꺼내올 때 등 다양한 시점에 적용이 가능하다
- Pointcut : 어디에 적용해야 하는지에 대한 정보를 가지고 있다.
AOP 구현체
- https://en.wikipedia.org/wiki/Aspect-oriented_programming
- Java
- AspectJ
- 다양한 Joinpoint와 Pointcut을 제공해준다
- Spring AOP
- 국한적으로 기능을 제공해준다
- AspectJ
AOP 적용 방법
- 컴파일
- 자바 파일을 class 파일로 만드는 조작이 된 바이트 코드에 적용 즉 컴파일 시점에 적용한다
- 적용시 성능적인 부하가 별로 없다. ( 별도의 컴파일 과정을 거쳐야한다)
- AspectJ가 사용한다
- 로드 타임
- A라는 클래스를 A라는 클래스로 순수하게 컴파일하고 A라는 파일을 클래스 로딩하는 시점에 적용한다. (로드타임 위빙)
- JVM안에 적용되는 메소드 안에 적용할 메소드가 같이 들어있다.
- 클래스 로딩할때 약간의 성능 부하가 발생할 수 있다. ( 로드타임 위버를 설정해주어야한다)
- 장점
- AspectJ를 사용함으로써 다양한 문법을 사용할 수 있다.
- 런타임
- Spring AOP가 사용한다
- A라는 Bean에 Aspect가 가진 메소드를 적용해야 한다는 것을 Spring이 알고 있다. A라는 클래스 타입의 Bean을 생성할때 A타입을 감싼 프록시 Bean을 만든다. Proxy Bean이 메소드를 호출하기 직전에 적용할 메소드를 먼저 호출한다.
- 최초의 Bean을 만들때 약간의 성능 부하가 발생할 수 있다. ( 로드타임의 성능과 비용이 비슷하다)
- 장점
- 문법이 쉽고 아무런 설정을 안해도 되고( 로드타임 위버 설정) , 별도의 공부를 하지 않아도 된다.
Spring AOP : 프록시 기반 AOP
Spring AOP 특징
- Proxy 기반의 AOP의 구현체이다
- Spring Bean에만 AOP를 적용할 수 있다.
- 모든 AOP 기능을 제공하는 것이 목적이 아니라, Spring IoC와 연동하여 엔터프라이즈 애플리케이션에서 가장 흔한 문제(중복코드 문제 등)에 대한 해결책을 제공하는 것이 목적이다
Proxy 패턴
- 왜 사용하는지?
- 접근 제어 또는 부가 기능을 추가 용도로 쓰인다

Client는 인터페이스 타입(Subject)으로Proxy객체를 사용하고Proxy객체는 원래의 타겟(Real Subject) 객체를 참조한다.Proxy와Real Subject는 같은 타입이다.Proxy객체가Real Subject를 감싼다
Proxy 패턴 사용 예제
- Spring AOP를 사용하기 전에 의존성을 추가한다
<dependency>
    <groupId>org.springframework.boot</groupId>
    <artifactId>spring-boot-starter-aop</artifactId>
</dependency>
Proxy 사용 안한
- EventService 인터페이스 생성
public interface EventService {
    void createEvent();
    void publishEvent();
    void deleteEvent();
}- SimpleEventService 클래스를 EventService 인터페이스를 구현하여 생성
import org.springframework.stereotype.Service;

@Service
public class SimpleEventService implements EventService{

    @Override
    public void createEvent() {
        long begin = System.currentTimeMillis();

        try {
            Thread.sleep(1000);
        } catch (InterruptedException e) {
            e.printStackTrace();
        }
        System.out.println("Created an event");

        System.out.println(System.currentTimeMillis() - begin);
    }

    @Override
    public void publishEvent() {
        long begin = System.currentTimeMillis();
        try {
            Thread.sleep(2000);
        } catch (InterruptedException e) {
            e.printStackTrace();
        }
        System.out.println("Published an event");
        System.out.println(System.currentTimeMillis() - begin);
    }

    public void deleteEvent() {
        System.out.println("Deleted an event");
    }

}- AppRunner를 ApplicationRunner 를 구현하여 생성
@Component
public class AppRunner implements ApplicationRunner {

    @Autowired
    EventService eventService;

    @Override
    public void run(ApplicationArguments args) throws Exception {
        eventService.createEvent();
        eventService.publishEvent();
        eventService.deleteEvent();
    }
}
- 결과
Created an event
1004
Published an event
2010
Deleted an event
Proxy 사용 예제
- SimpleEventService 클래스 수정
@Service
public class SimpleEventService implements EventService{

    @Override
    public void createEvent() {
        long begin = System.currentTimeMillis();

        try {
            Thread.sleep(1000);
        } catch (InterruptedException e) {
            e.printStackTrace();
        }
        System.out.println("Created an event");
    }

    @Override
    public void publishEvent() {
        long begin = System.currentTimeMillis();
        try {
            Thread.sleep(2000);
        } catch (InterruptedException e) {
            e.printStackTrace();
        }
        System.out.println("Published an event");
    }

    public void deleteEvent() {
        System.out.println("Deleted an event");
    }

}- System.out.println(System.currentTimeMillis() - begin); 제거
ProxySimpleEventService 클래스를 EventService 로 구현하여 생성한뒤 Primary로 주 서비스로 실행
@Primary
@Service
public class ProxySimpleEventService implements EventService{

    @Autowired
    SimpleEventService simpleEventService;

    @Override
    public void createEvent() {
        long begin = System.currentTimeMillis();
        simpleEventService.createEvent();
        System.out.println(System.currentTimeMillis() - begin);

    }

    @Override
    public void publishEvent() {
        long begin = System.currentTimeMillis();
        simpleEventService.publishEvent();
        System.out.println(System.currentTimeMillis() - begin);
    }

    @Override
    public void deleteEvent() {
        simpleEventService.deleteEvent();
    }
}- 결과
Created an event
1004
Published an event
2006
Deleted an event- 결과는 같다
Proxy 패턴 단점
- 동일한 중복 코드가 있다.
- 프록시 클래스 및 코드를 생성하는데 비용과 시간이 들어간다
- 모든 것을 델리게이션 해줘야한다
- 다른 클래스에도 적용해야하면 여러개를 만들어줘야한다
단점을 보완하여 등장한 것이 Spring AOP이다
Spring AOP : @AOP
- Spring IoC 컨테이너가 제공하는 기반 시설과 Dynamic Proxy를 사용하여 여러 복잡한 문제를 해결해준다
- 동적 프록시(Runtime) : 동적으로 프록시 객체를 생성하는 방법
- 자바가 제공하는 방법은 인터페이스 기반 프록시 생성.
- CGlib은 클래스 기반 프록시도 지원
- Spring IoC : 기존 빈을 대체하는 동적 프록시 빈을 만들어 등록시켜준다.
- 클라이언트 코드 변경 없다
- AbstractAutoProxyCreator implements BeanPostProcessor
Aspect 정의
- @Aspect
- 빈으로 등록해야 하니까 (컴포넌트 스캔을 사용한다면) @Component 도 추가한다
Pointcut 정의
- Pointcut = 적용범위
- @Pointcut(표현식)
- 범위
- execution -> include필터
- !execution -> exclude필터
-
- -> 모든것
- *(..) -> 모든 메소드
- .. -> 모든 경로
- && -> 필터 추가
- 범위
- 주요 표현식
- excution
- @annotation
- bean
- 포인트컷 조합
- &&, ||, !
Advice 정의
- @Before
- 메소드 실행 전
- @After
- 메소드 실행 후
- @AfterReturning
- 메소드 정상실행 후
- @AfterThrowing
- 메소드 예외 발생 후
- @Around
- 모든 동작시점
- Advice를 어떻게 적용할 것인지 메서드를 감싸고 있는 형태로 적용 된다.
- 메서드 호출이전 이후에 적용 가능하다.
- 다용도로 사용이 가능하다.
Annotation Logging 사용 예제
- SimpleEventService 클래스 메소드들에 @PerLogging 적용
@Service
public class SimpleEventService implements EventService{
    @PerLogging
    @Override
    public void createEvent() {
        long begin = System.currentTimeMillis();

        try {
            Thread.sleep(1000);
        } catch (InterruptedException e) {
            e.printStackTrace();
        }
        System.out.println("Created an event");
    }

    @PerLogging
    @Override
    public void publishEvent() {
        long begin = System.currentTimeMillis();
        try {
            Thread.sleep(2000);
        } catch (InterruptedException e) {
            e.printStackTrace();
        }
        System.out.println("Published an event");
    }

    public void deleteEvent() {
        System.out.println("Deleted an event");
    }

}- @PerLogging Annotion 생성
// Annotation을 만들때 주의점은 RetentionPolicy를 CLASS이상으로 줘야한다
@Retention(RetentionPolicy.CLASS)
// Retention : Annotation 정보를 얼마나 유지할것인지?
// CLASS : CLASS 파일에서만 적용 @PerLogging 적용시 Annotation 정보가 바이트 코드까지 남아있는다
// SOURCE : 컴파일시 사라진다
// RUNTIME : RUNTIME시 사라진다
public @interface PerLogging {
}- Annotation을 만들때 주의점은 RetentionPolicy를 CLASS이상으로 줘야한다
- @Retention
- Annotation 정보를 얼마나 유지할것인지?
- CLASS : CLASS 파일에서만 적용 @PerLogging 적용시 Annotation 정보가 바이트 코드까지 남아있는다
- SOURCE : 컴파일시 사라진다
- RUNTIME : RUNTIME시 사라진다
execution , Annotation, Bean 사용 예제
import org.aspectj.lang.ProceedingJoinPoint;
import org.aspectj.lang.annotation.Around;
import org.aspectj.lang.annotation.Aspect;
import org.springframework.stereotype.Component;

@Component
@Aspect
public class PerfAspect {

        @Around("execution(* kr.springcoreproject..*.EventService.*(..))") //1번 execution
        @Around("@annotation(PerLogging)") //2번 Annotation
        @Around("bean(simpleEventService)") //3번 Bean
    public Object logPerf(ProceedingJoinPoint pjp) throws Throwable{
        long begin = System.currentTimeMillis();
        Object retVal = pjp.proceed();
        System.out.println(System.currentTimeMillis() - begin);
        return retVal;
    }
}- logPerf 메소드 매개변수인 ProceedingJoinPoint 는
- 대상 적용 이벤트 필터이다
- proceed()
- 메서드를 실행해주는것
- throws Throwable 필수
1. execution 적용시
- 해야할 일 = Advice
- @Around("execution(* kr.springcoreproject...EventService.(..))")
- kr.springcoreproject 패키지 모든 하위인 EventService 클래스 모든 메소드에 적용
- Advice를 어떻게 적용할 것인지 메소드를 감싸고 있는 형태로 적용 된다.
- 메서드 호출이전 이후에 적용 가능하다.
- 다용도로 사용이 가능하다
- 단점
- execution 끼리 조합이 안된다
- 할수는 있는데 execution advice를 두개를 만들고 중복되는 코드를 Aspect 메소드로 빼서 사용
- execution 끼리 조합이 안된다
2. Annotation 적용시
Logging 사용시 추천
- @Around("@annotation(PerLogging)")
- @PerLogging Annotation이 되어있는곳만 적용한다
3. Bean 적용시
- @Around("bean(simpleEventService)")
- 빈이 가지고있는 곳 모두에 적용이 가능하다
결론
- Spring AOP는 사용 용도에 맞게 Aspect 를 사용하는 것이 중요하다고 생각한다.
- Logging 사용시 Annotation으로 적용하는것을 추천한다
References
- 해당 포스팅은 백기선님의 인프런 - 스프링 프레임워크 핵심 기술 강의를 보고 정리한 자료입니다.
'Spring > Spring Core' 카테고리의 다른 글
| [Spring] Spring Null 처리 하는 법 (Null-safety) (0) | 2020.11.06 |
|---|---|
| [Spring] SpEL(Spring Expression Language) (0) | 2020.11.05 |
| [Spring] 데이터 바인딩 추상화 - Converter, Formatter (0) | 2020.11.05 |
| [Spring] 데이터 바인딩 추상화 - PropertyEditor (0) | 2020.11.05 |
| [Spring] Validation 추상화 (0) | 2020.11.04 |